Showing posts with label tutorials etc. Show all posts

Thursday, 26 June 2025

I'll Dye For You


From the sublime to the slime
Here's an exceedingly long and beautiful prom dress spread out on my bed. The owner is about my height. I have just shortened the frock by about 9". I will be vacuuming tiny blue sparkly sequins from the carpet for months. Really tiny, here are two beside a 20p piece.

She's my GSCE student, and it is her 16th birthday this week. It has been fun working with her, I hope she enjoys her prom. Meanwhile her younger brother is in the school play. He came home with a list of requirements for his costume - which included "Two tan shirts, one must be covered in slime"
Mum asked if I had any ideas - the price of tan shirts is too much - so I suggested getting a twinpack of white school shirts and dyeing them. Where do I get the dye? she asked. I said it could be done with a pot of coffee. "I'll dye for you!" I said. Here's A Quick Tutorial

Take the new shirts and wash them [to remove any 'dressing' in the fabric] Whilst still wet immerse them in a large pan containing 1 strong pot of coffee, one pot of stewed tea [2 tea bags] a tbsp salt and a tbsp vinegar. Bring to boil, simmer 20 minutes stirring constantly. Allow to cool, then transfer to smaller pan or bowl, and pour liquid over shirts. Put a plate or pan lid on top, weigh it down [eg 2 cans tomatoes!] to keep shirts submerged. Leave to soak overnight. Remove, rinse and spin [you can do that in your machine] Hang to dry.

One can go back in the packet, prepare the 'slime' for the other. Find some plastic bags, preferably grey, green, black. 

I used a heavyish grey refuse sack, and some 'parcel' bags [M&S dark green] and lighter green compost caddy sacks. And a blue latex glove. Cut out a 'waistcoat' from strongest bag, and lots of 'slimy dribbles' from the other bags.
Stick the dribbles down with appropriate adhesive - along the top edges so the garment does not become too stiff.
Wrap this round the shirt and stitch down the front and round the neckline. If necessary, cut the armhole slot a little bigger to allow for movement!


Wednesday, 4 December 2024

Christmas Creations

First of all, thanks for all your wonderful memories of retro foods. I have visions of CS up and down the land being overwhelmed by donations of your long forgotten fondue pots! I found a blogpost from 2017 with some retro recipes including prawn cocktail.
I have been busy with the littl'uns this week. After Ro and Jess went home on Sunday afternoon, I got busy preparing for Brownies [Monday] and Little Acorns Toddler Group [Tuesday]
With the Brownie I did two tried and tested crafts - 'baubles' and 'Napkin Santas' - with the Toddlers, we were using this year's Bible Society toddler materials - and they suggested the little party hats for the children.

If you want to make the baubles, my tutorial is here
I made the santa napkins half size using cocktail napkins, and fixed a hanging loop to the top so they could be hung on the tree. Full size ones can be used as part of your Christmas place setting. My tutorial for them is here
I recycled last year's Gardener's World Calendar to make the strips for the baubles, they were very colourful and these KS1 children made them with minimal help.

Bob and I are now turning our attention to ensuring we have enough stuff to sell at the Charity Craft Fair on Saturday.

Friday, 7 June 2024

Girl Bands [A DIY Tutorial]

Rose went to a craft fair and tried on a headband. It was an animal print fabric, with a little knot on the top. She looked gorgeous, and she really wanted it. But it cost £14. Mummy Liz suggested she should see what Grandma could do. I searched on line, and found a number of video tutorials and DIY patterns. I bought a pack of simple hairbands, and a pack of 6 polycotton squares. Here is my template, cut from a cereal packet.
The tie is a strip 1½" x 8" cut to a point at each end.
The main band - 16" long, 1½" at each end, and 3" in the middle. You will see the pattern is half length, you need to place it on the folded fabric. Cut two pieces of each shape
Right sides together, sew round the edge of the tie.
Turn out and press. Sew up the gap neatly
On the band, right sides together, sew just along the LONG edges. Turn out, press. Now slide the band through the tube, and tuck in the raw ends at each end. make pleats to gather up spare fabric.Sew across neatly by hand.
Now tie the tie round the centre, pull tight  [Fold in spare fabric on the top of the band - this loose fabric adds to the effect] Hold tie in place with a few stitches on the underside.
I polished off half a dozen in an afternoon. The girls were delighted, and took the spares back for their friends.
If the fabric is fine and floppy, the use iron on lightweight interfacing on just one of the two tie pieces, and on one piece of the band strips[the upper strip] Total cost about £1 per band, and I have lots of fabric, and a loads of bands leftover.


Thursday, 25 January 2024

The Milk Of Human Kindness - A Yogurt Tutorial

Lady Macbeth uses this phrase - concerned that her husband's compassion will get in the way of her ruthless plans for his future kingship. Milk is an important part of our diet - certainly at birth, and "mother's milk" is a term meaning something very necessary for life. As we grow older, things change - many nations drink a lot of cow's milk. In Finland the average is 2 pints per day, in the UK just over a pint. But in some countries there is widespread lactose intolerance [e.g. Yemen and South Korea] and some religious groups have rules about milk [Jews do not eat meat and milk together, or cook meat in milk]
Before the advent of fridges, people were concerned to ensure their milk was fit to drink - hence the development of things like kefir and yogurt- both fermented products, and clotted cream, which is heat treated, and can last up to 14 days. 
I like yogurt, and for years have been making my own. Anne asked for a tutorial. I use an electric yogurt maker like this. Sadly they are no longer made!
The basic principle of home made yogurt is this - take a pint of milk, warm it to 'blood heat' , stir in a tablespoon full of natural yogurt, and leave in a warm place overnight.  And in the morning, voila! yogurt.
You can use an electric model - they use less energy than leaving a light on overnight - or simply put the warmed milk into an insulated flask [this Kilner system is good]  Here is a simple recipe from Tesco
Over the years I have modified my system
  • I use UHT milk - because that way I can make it as and when I need it, without using up our 'everyday' milk from the fridge
  • I add a heaped tablespoon of dried milk powder to give a richer yogurt
  • I've discovered that using whole UHT milk gives a really lovely creamy texture, more like Greek yogurt
  • Once made I use the yogurt as is - perhaps adding fruit, nuts, a spoonful of honey/maple syrup/jam as a sweeter.
  • If I am almost at the end of a jar of jam, I will mix it in with a stick blender to make pink yogurt!
  • I use it as a topping for desserts in place of cream or custard [sometimes sweetening with a teaspoon of icing sugar]
  • I use it in recipes, often in place of buttermilk, eg in scones or soda bread - or spoon a little on top of a bowl of thick soup.
  • I blend yogurt into smoothies and milk shakes [and this summer I plan to make frozen yogurt ice creams as an alternative to shop-bought UPF ices]
  • Strained [through coffee filter, kitchen paper or muslin cloth] it makes a soft cheese, lovely with a little salt and chopped fresh herbs. Keep the whey and use in scones, or as stock in soup.
  • Make a pancake batter with eggs, yogurt and a banana.
DO keep everything spotlessly clean, or the yogurt will spoil quickly.
DO remember to keep back a spoonful to start your next batch
IF it starts to taste acidic, then buy a small pot of yogurt and use that as a fresh 'starter'
QUICK IDEAS
layer up granola, yogurt and fruit in sundae dishes for a quick dessert
add chopped cucumber and mint to yogurt for raita to serve with curry
mix yogurt 50/50 with mayo for a lighter coleslaw dressing, or for Coronation Chicken
In my teens, I was staying overnight with a friend. She said yogurt was supposed to make a good facemask for purifying the complexion. We bought a pot from the co-op. At 9.30pm [after her brother had gone to bed] we smeared it on, and left it to dry, then around midnight, sleepily rinsed it off and went to bed. We awoke with smelly yellow streaks on our necks and ears. Since then I have eaten yogurt but not used it as a cosmetic!
Liz had this lovely book for Christmas and she has sent me Olia's recipe for drop scones, which uses kefir [usual method]
  • 150ml kefir
  • 1 egg
  • 100gm flour
  • ½tsp baking powder
Do you make your own yogurt?
Do you have a favourite recipe which uses yogurt?


Wednesday, 7 December 2022

Sew Very Christmassy

Dereham Library has been closed for building work - but it has re-opened so we went in to change books. It was remarkably noisy, somewhere behind the wall we could hear power drills "This is Very Noisy for a LIBRARY!!" shouted another woman. I grabbed three books from the Christmas Craft display which caught my eye. All very different, with some clever ideas [for 2023 - I don't have time now to produce anything!]
Christmas Crafts Scandinavian Style by Tone Merete Stenkløv and Miriam Nilsen Morken was exactly that. If you like Tilda's World, you will be right at home here. Slim hearts, long-legged angels, quirky snowmen, and patchwork. 50+ projects. Unlike the British fondness for red and green, the colour palette is red, white and brown. 
Clear instructions, good templates *****
Craft it Up Christmas, Around the World is an excellent book for children's craft. Fun projects 'inspired by travelling' Libby Abadee and Cath Armstrong have ideas from 35 countries - each has clear instructions, good photographs, and a 'fun fact' about Christmas in each of the countries visited.[in the Philippines, they hang star shaped lanterns called paról] Sweets, gifts and decorations. "for all ages and abilities" says the blurb, and I would agree. Its publised by Cico press, and their craft books are usually very reliable [good index, plus lists of Craft Suppliers in USA, UK and Oz] I may have to renew this one, so I can look through it with Rosie *****
And finally Sew Advent Calendars by Debbie Shore. From SearchPress, another great source of craft books - you may know DS's "Half Yard" series. I'd read the other two and already rated them ***** for their ideas, instructions, illustrations and indexes - but this one is so innovative, it gets
*****too. I'm a little sad that none of the 20 projects is a countdown to the birth of Jesus - no manger, kings or even angels in evidence - but the different suggestions are really interesting. 
Two thirds of the projects have 24 pockets/pouches/pyramids/whatever but there are a load more intriguing 'countdown' items - A 'Calendar Girl' with a chalkboard for writing 'how many sleeps till Christmas, two number cubes, and a [slightly less interesting] calendar to count down the weeks [only four pages] Debbie includes two "Twelve Days of Christmas" projects - which is odd, as they are supposed to follow the Big Day, not be in the run-up...But her white towelling snowman has twelve bright pockets [ and she suggests if you made them half the size then you could fit 24 on his tum] And her 12 cones are a very clever idea. Here's her video [be warned - it lasts 20 minutes!]

I like her Christmas Cottages bunting - and am contemplating making a row of houses in Bethlehem, with a stable for the last one...[middle picture on left hand side of book cover] Not altogether convinced by the dog biscuit calendar for pets though!
So there you have three Christmas Craft Book Reviews. Apologies that it is too late for this year but file the ideas away till next autumn. 
Do you have an Advent Calendar? Home made or bought?
Does your contain chocolates [or make-up, seeds, jam or tea-bags...the choice of gifts gets more random each year]

Friday, 11 November 2022

Jigs And Jumpers [And A FREE Pattern}

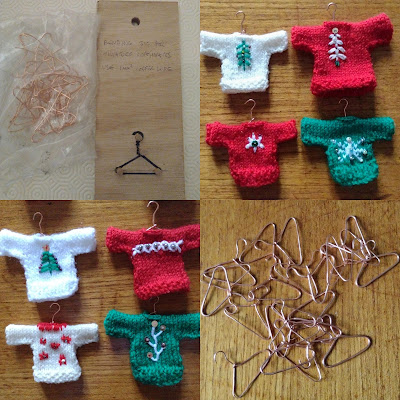
Years ago when I belonged to a knitting group, I made a few mini Christmas sweaters to hang on the tree. I decided to make some for the pop-up shop this year. But I simplified the pattern so I could knit one up in half an hour. Having sorted out some oddments of wool in white, red, green and cream [suitably Christmassy colours] I made a whole batch. 

Bob, who is a very clever chap, made some mini coat hangers with 1mm² copper wire. He created a jig with three screws in a piece of wood, and wrapped the wire around. I think they finish off the decorations beautifully.

For some of the jumpers, I knitted 2 colours into  the pattern as I went along - but for most I stitched it afterwards and added beads or sequins for festive sparkle.


Here is the pattern - using DK wool and size 2.75 needles [old UK 12 or US 2] You need just a few grams.

Mini Christmas Sweater Pattern

  • Leave 20 cm of yarn at the cast on/ cast off for sewing up.
  • Cast on 13sts
  • Knit 4 rows in K1P1 rib OR knit 4 rows in moss stitch.
  • Working in stocking stitch from here on
  • Knit 10 rows 
  • Knit 1 row, cast on 6 sts [19sts]
  • Purl 1 row, cast on 6 sts [25 sts] 
  • in st st work 5 rows.
  • Purl 10 sts, cast off 5 sts, P to end [20sts]
  • Knit 10 sts, cast on 5 sts, K to end
  • st st 5 rows
  • cast off 6 work to end [19 St's] 
  • cast off 6 st work to end [13sts]
  • st st 10 rows
  • work 4 rows in K1P1 rib, OR moss stitch
  • Cast off.
Add contrast stitching and trimmings before sewing up side and underarm seams. The neckline looks neater with a row of blanket stitch round it

Note 1; These are ornaments NOT toys [small beads, sharp wire] and will not fit dolls [neckline way too small to go over head.

Note 2; This is MY pattern, I made it up - and it is free to anyone to copy and use. [But please acknowledge that you found it on this blog]

I think they are rather cute. Thank you Bob for the hangers!

Wednesday, 19 October 2022

A Morning Of Making

Another project underway, details to follow. But I spent an hour and a half on my knees yesterday in front of the coffee table in the lounge.
Using some coloured card from my stash, and my WRMK Envelope Maker I made a couple of dozen envelopes.
A number of blogs I have read recently have mentioned making envelopes. Either for 'orphaned' greetings cards, or because folk are starting to make seasonal greetings.
I had not heard of WRMK till 3 years ago, when I started finding their punch boards at yard sales and in CS.
They are not cheap to buy new- but I have certainly had my money's worth from my bargain buys.
You can make your own envelopes without such gadgets - I have been doing so ever since my Dad taught me when I was at school. And when life is less full, I will try and post a tutorial. 
But if you need a lot of envelopes, and you have a stack of scrap paper/thin card to hand, these nifty bits of kit save hours, and produce good results.
UPDATE  here's a video of the WRMK board being used


Tuesday, 24 May 2022

Give Us Today - A New Craft Idea...

 We have been studying the Lord's Prayer at Café Church, and on Sunday we reached "Give us today our daily bread". But what could I do with the children? They sit round a table at the side of the chapel, and we cannot make too much noise. We began by talking about food - why is it important?

  • It gives us energy
  • It helps us grow
  • It keeps us healthy
  • It makes us happy
I expanded the last point, and talked about 
  1. eating favourite foods, and certain tastes giving pleasure. 
  2. We discussed the fact that sharing food makes us happy [family Sunday Roasts, birthday parties- and sharing the food we have with others who do not have any]
  3. Food makes us happy because it reminds us that God provides for our needs, and he cares for us.
We had a worksheet to colour in. But before we did the sheet, I wanted to do some sort of different craft. I have a handful of children, all under 7 [and some adult help!] but we do not have very long - and we cannot make a lot of mess.
After some internet trawling I came up with the idea of a stained glass window. This meant preparation on Saturday evening.
First I printed off a picture of a child kneeling in prayer. I typed "Give us today" and "our daily bread" using WordArt. That meant I could curve the words, and  flip them to mirror image. Then I took a lamintor sheet, and opened it up. I put the template underneath and traced the words and picture with a Sharpie onto the inner, matte side of the 'top' sheet,

I folded an A3 sheet of paper round the sheet, and folded the other blank sheet over it, and paperclipped it all round. Then I cut lots of squares of tissue into 4 [random quadrilaterals, not perfect squares] On Sunday I gave each child a bowl of tissue shapes and a glustick and encouraged them to cover the plastic sheet with squares, overlapping to leave no spaces.
They all enjoyed this, and it was relatively mess free! Whilst the other adults supervised colouring the worksheet, I took the tissued sheets across to the laminator. I removed the protective paper, flipped the 'picture' sheet over and put the whole thing through the machine.
Voila! a stained glass window. The children were really pleased with them, and I suggested they could tape them to a window when they got home to let the sunshine through.
At the end of the service, Pastor Nick invited them to come to the front and show their work to everyone - and for once, they actually shared the all key teaching points!
I think this craft could be developed in all sorts of ways - you could put any picture or wording on the top sheet, and maybe use different tissue shapes or set colourways for other lessons - not just Bible themes
Leaves and flowers [nature stuff] Red/orange/yellow flame shapes [Pentecost - or great fire of London]
Blue and green waves...etc etc
Because the Sharpie is on the inside, it cant get washed off. You do not need to stick every piece of tissue down completely - just a tiny dab in the centre will hold it in place till lamination 'fixes' it.


Saturday, 7 May 2022

Box Sets

In our family, we have always enjoyed board games. But they do take up a fair amount of space. I decided I needed to tidy up the shelf. We have children's games, like Junior Scrabble and Kangaroo, and 'trad' games from my childhood [Cluedo, Monopoly, Scrabble] and some of the newer games. Over the years we acquired duplicate, because we liked having games 'at home' but also here in Norfolk for holidays. Duplicate Monopoly, Scrabble and Trivial Pursuit have gone to the CS. 

Back in 2008 I reconfigured one Scrabble board, and made a waterproof zip bag so that we could slip the game into the motorbike pannier for our holiday. I wondered if there was any way to modify other board games in our collection to take up less space. 
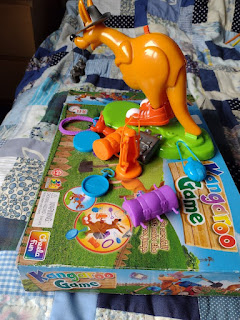
In a CS in Sheringham, I'd bought "Kangaroo" [very like Buckaroo] to play with Rosie - you load all the kit onto the animal till the spring clicks and throws everything into the air. But the original plastic tray was missing, and all the components were rattling around in the large box. I trimmed it down by about 50%. Everything fits neatly, into the smaller box.
We have Cranium, which we love- and Steph gave me a box of extra cards for my birthday. By removing the plastic insert, it was possible to get old and new cards neatly into the box. There was a lot of wasted space and the new arrangement is much neater.


I have done a similar thing with my extra Trivial Pursuit cards. My next move will be to cut the Cluedo Board to make it fold into a reduced size box.[This post  has a tutorial on modifying boards]

Do you have a favourite board game?
How do you store the boxes?


Friday, 10 July 2020

That's Enough Unicorns For Now, Thankyou

Rosie loved her day - I was utterly exhausted at the end of it. I'd made little headbands to turn the Sylvanian Ponies into Unicorns, and tied gold thread round their tails. They were all lined up to greet her on arrival. In the morning we had two unicorn stories - one which I had made up with words she could read, and then at snacktime we watched "Sugarlump and the unicorn" on YouTube [It's by Julia Donaldson, the Gruffalo author] and we did unicorn maths, and made a Unicorn-Fairy-Headband [using up some silk flowers which had been in a vase in the back bedroom] Liz - who was in on eh surprise, had made sure Rosie was in her Unicorn Tee Shirt.
In the afternoon we made a Unicorn Palace, complete with drawbridge, towers, turrets and crenellations.

On Monday evening, I had painted some scrap boxes and tubes and cereal packets with some blue emulsion paint.I cut narrow strips of card and then snipped along the length. Rosie pushed down alternate tabs and then I cut them off to make the crenellations, which we then stuck round the tops of the walls.. I don't know why children are fascinated by that word. But they are. 
I also reminded her what we learned on shapes day, and she found that the sides of the boxes are rectangles, that a tube [cylinder] can be made with a rolled up rectangle, and a cone is made using a circle which has a slit in it and rolled. We made conical turret roofs [from the cover of an old magazine] And stuck fabric flags on sticks.Our palace had a drawbridge too
TUTORIAL If you want to make a unicorn horn, like the ponies are wearing, Iron piece of lightweight interfacing onto a piece of fabric and cut out a 5 cm diameter circle. [This makes 4 horns] Cut this circle into quarters. Fold in the straight sides to the centre, roll up from left side to right and stitch down, to make a cone. Make a loop from elastic, and sew the base of the cone to that. The height of the horn will be half the diameter of the circle. I drew round a lid. I also wound gold thread round afterwards to add a bit of sparkle.
The ponies [sorry, unicorns] played happily for ages till hometime.
Unicorns have been popular since medieval times, Lewis Carroll brought them back into popular Victorian culture when Alice went through the Looking Glass, and then in the 1980s, My Little Pony's Unicorns galloped into bedrooms across the nation. In 2015, the MLP film revived interest. Little girls are fascinated by them [one of my friends actually thought the bible story in Acts 8 was about Philip and the Ethiopian Unicorn] 
Depending on what you read, these mythical creatures symbolise virtue, purity, honour, strength, courage, miracles, individuality and the right to be different.
Rosie loves them, and if it helps to get her enthusiastic about learning, I don't mind planning a day of unicorn themed activities.

Wednesday, 17 June 2020

Full Of Beans

After two days of Grandma's Nursery, Rosie and I seem to be surviving. She was so excited by having her own desk, and she loves putting the name of the day and the weather details on the chart each morning. Having activities listed on the Velcro strip is useful too. 
On Monday afternoon we did role play, using the Sylvanian stable and ponies which belonged to Liz when she was in Early Years. Rosie had not seen these before, they have been in the loft. She was delighted with them and started making up stories and scenarios, including a flying pony. I introduced her to the idea of Pegasus - and we found a story online. I had already intended Tuesday to be Shapes Day - but I modified my plans a little...
We used the six pieces of pony fencing to make shapes - and Rosie made the square, triangle and rectangle with no problem. We arranged them in a ring, and I was informed "It's not a proper circle, it's a hexagon Grandma" [that's me told, then]
One item I don't have with me is a ball of any sort. I thought I would make a bean bag or two, then decided Rosie could help me at the sewing machine.
Making a bean bag is a brilliant activity for discussing shapes.
Quick tutorial [I tried to draw an instruction sheet tutorial, but it was taking too long]
  1. Cut out a piece of fabric 11cm x 22cm. This is a rectangle
  2. Fold it in half to make a piece 11cm x 11cm. This is a square
  3. Put the folded edge to the left, and sew down the right side with a narrow seam. Still a square.
  4. Open up and flatten with the seam now running down the centre front. Still a square
  5. Sew a seam along the bottom edge to make a bag. Still a square
  6. Open the top of the bag, flatten the other way, so that the 1st seam is to the left edge. Sew a seam along the top, stopping halfway.
  7. Turn the bag inside out through the hole, pushing out the corners with blunt end of a pencil.
  8. Flatten the bag, it will be a sort of triangle shape.
  9. Fill the bag with uncooked dried beans, sweetcorn or rice. Sew the hole up tightly.
  10. You have a pyramid shaped beanbag
Rosie is holding our two beanbags in the bottom left picture. They are really good for throwing practice, they do not bounce wildly. We threw to one another and into a plastic bowl. I impressed Rosie by juggling two bags at once. No, I cannot juggle three, perhaps I should make a third beanbag, and use lockdown time to learn a new skill. On second thoughts, I will follow everyone's instructions to rest in the evenings.

Saturday, 9 May 2020

The Yoda Hat For Baby It Is

I meant to post this on Monday [aka Star Wars Day, May the Fourth be with you and all that]  Steph sent a request for a baby yoda hat in green, and a link to the free pattern. But I did not have any 'bulky' wool, or the necessary circular needles. So I rewrote the original pattern for dk, and did it on 2 needles, with a seam up the back. The original pattern is here, my variation is below the photograph
Baby Yoda Knit Hat [double knit]
Materials: Approx. 25 grams of double knit yarn ,pair each of size 4mm and 3mm needles.
Tension – 24sts x 30rows to 10cm² [approx] for hat
Abbreviations: K – knit, K2tog - knit two together, P – purl, P 2tog – purl 2 together
Kfb - knit through front and back of loop, stst – stocking stitch.
Finished measurements: 15” around the brim; 5”tall [with the bottom edge slightly curled, which it will do naturally]
  Pattern for the HatCast on 80 stitches using 4mm needles.
Work in stocking stitch until the hat measures 4”, then start decreasing as follows:
K2tog, K14, rep. until end of row [75sts]
P13, P2 tog, rep. until end of row
K2tog, K12, rep. until end of row
P11, P2 tog, rep. until end of row
K2tog, K10, rep. until end of row
P9, P2 tog, rep. until end of row
K2tog, K8, rep. until end of row
P7, P2 tog, rep. until end of row
K2tog, K6, rep. until end of row
P5, P2 tog, rep. until end of row
K2tog, K4, rep. until end of row
P3, P2 tog, rep. until end of row
K2tog, K2, rep. until end of row
P1, P2 tog, rep. until end of row [10 sts]
Cut off your trailing yarn, leaving a 4 inch tail. Thread the yarn tail through the remaining stitches, pull tight, then secure the tail by knotting on the inside of the hat.
  Pattern for the ears [make 2]: switch to 3mm needles [this will produce a tighter weave so the ears are less likely to droop] Work in garter stitch [ie all rows knit]
Cast on 16 stitches [leave a 12” long tail which you can use later to stitch the ears onto the hat]
Rows 1-4: K
Row 5: K7, Kfb, Kfb, K7 [18 stitches]
Row 6: K8, Kfb, Kfb, K8 [20 stitches]
Rows 7-18 knit
Odd numbered rows, 19-51 K1, K2tog, K to end
Even numbered rows, 20 -50 K all stitches [ending with just 3 sts]
Row 51: K1, K2tog [2 sts]
Cut off your trailing yarn, leaving a 4” tail. Thread the yarn tail through the remaining stitches, secure with a knot, and weave in. 
  Making up Sew centre back seam of hat. Stitch the ears onto the sides of the hat. If you fold down the curved portion of the ears as you stitch them onto the hat, they will be less floppy and have a more authentic Yoda look [see photo]

Tuesday, 12 November 2019

I Take My Hat Off To You For This Tutorial...

... as the Actress said to the Bishop.
I just have to share this one- because it is so easy and you just never know when someone will need to dress as a Pope, or a Bishop. I wanted to make a Mitre for the bishop in the play, so I looked on Pinterest for inspiration. 
Believe or not, there are dozens of these hats online - mainly posted by Catholic friends- it seems that when the Bishop [or even the Pope] visits their parishes, the children love to dress up. 
You remember those paper hats we made as children from folded newspapers?
Well if you make two, and fold one round and tuck it into the other, you end up with a bishop's hat.
I looked at the many online instructions [such as these] and began with a paper version, then attempted to make a hat using the leftover purple fabric.
It was a bit floppy at first.
I realised I needed to actually sew the centre slit closed, and put some card triangles into the hat for stiffening [cereal packet weight] 
Having done that, I wrapped them round and sewed them together at the side edges, and then trimmed the hem with a piece of decorative ribbon. This worked really well. I stitched the top points together, and here's my Mitre.

Now if only Bob were a member of the Anglican clergy, I could happily spend all my time making embroidered ecclesiastical vestments for him...

Thursday, 12 September 2019

All Greek To Me [Not Exactly A Toga Tutorial]

Ferndown Middle School is having a "Greek Day" today. Pupils are expected to go in costume. Could I help my friend with a toga? Well yes- but actually togas are difficult to manage all day in school, and women often wore a garment called a chiton anyway. That is pronounced Kye-ton. You thought it was sheet-on didn't you? So did I, till Bob [who knows all about Greek] enlightened me. I think sheet-on is a good name, because that it what it is.
This easy chart shows how to make one out of a sheet.
It didn't take long to produce one on Sunday afternoon. 
Although Greek girls left one side open, I stitched up the side seam. I am concerned for my young friend's modesty [it also means she can wear leggings underneath if the weather is cold!
The fold-over top is called the apoptygma and the girdle is called the zoster. I had some silk ivy leaves in the Great Stash, so wound some onto florist's wire to make a garland. 

Sorted! or should I say Eureka?
Trivial fact - Ole Kirk Christiansen called his plastic bricks Lego because that is Danish for "play well" 
But in New Testament Greek lego means "I say"
Does this mean many Greek jokes begin "Lego, lego, lego..." ?

Tuesday, 13 August 2019

Catching The Thread

Do you have a thread catcher? Quite often I sit watch TV with a small sewing task in my hands [providing it isn't a Russian programme where I have to concentrate on subtitles] I seem to generate lots of short lengths of trimmed thread. I attempt to pile them neatly on the coffee table, or drop them straight into the wpb. But it does not work - they drift round the bin, falling like confetti on the carpet, or catch on my clothes and travel round the house. When I saw these little "collapsible thread catchers" I decided they would be ideal for my purpose. Not just for sofa-sewing but for when I'm stitching on the train, or out and about anywhere.
They are also useful for holding a folding pair of scissors and a tiny spool of thread. They are little cylindrical buckets about 3"high and 3" in diameter, but flatten away when not in use [holding the thread inside for later disposal] Making one takes a small piece of fabric, some scrap card, a bit of wadding, thread... and a ring from a Pringles tube.
If you go to this site you will find an excellent tutorial, so I am not going to write my own here. I've made 3 now, and will leave one here at Cornerstones and take the other two back to Dorset. I think they'd make lovely little gifts for people who enjoy sewing "small projects"
I have done two other sewing tasks since we got here - mending a cotton tote bag for Liz, and altering a bridesmaid dress for my niece Lucy. That's been fun - there is amazing pleating on the bodice, and down the back it fastens with lacing which pulls into a neat fishtail. 
She's bridesmaid for her friend on Saturday - hope the weather will be kind...