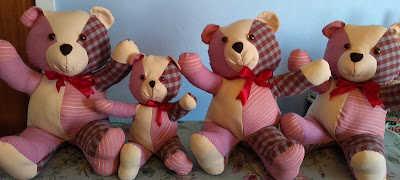
My friend asked if I could make her some memory bears - three 'regular sized' plus a smaller one. The shirts arrived, and I began my task. It occupied me for the best part of a week. I posted a picture of the WIP on my Facebook page and was deluged with questions - so here's my attempt to answer the FAQ.
No, I don't do this 'commercially' - I make them for good friends, and it is an opportunity to use my sewing skills to bless others. I charge for the 'extras' [stuffing, thread and safety eyes] If they wish to show their gratitude in other ways, that's up to them. But I am not in this to make money. I use the HowJoyfulBear pattern as my starting point. But I printed out the pattern on four different colours of paper- so that I could then make a multicoloured patchwork bear.
I ask for between 6 and 8 shirts - and then choose just four which go well together. All the bears in a 'family' will look the same. It is not for a novice needleworker. I allow between 6&8 hours per bear. The small one takes just as long, and is more fiddly.
Yes,they do take an awful lot of stuffing! I use hollowfibre pillows. It is the same stuff as toy filling, but way cheaper - and you need about 1½ pillows per bear. I have a large trug beside me, and I snip the corner of the pillow and pull out handfuls and tear the fibre into smallish clumps. This prevents the stuffed bear from feeling lumpy.Here is my shredded fibre, and my trusty chopstick. You must push the stuffing well into the 'extremities' - four paws, the nose, the tum and the edges of the face or the bear will look thin and unloved.The pattern tells you to make up the body and head, attach the back of the head/neck and then stuff. This does not work well for me. I stuff head and body separately, and close up the apertures with diamonds of fabric. When I sew the head in place, it is much easier to align the seams [see picture above]
Yes, I reduced the downloaded pattern on my PC to make the fourth bear. I had to do more hand sewing on this, it was too fiddly to manage on my machine. Also I had to source smaller safety eyes [I always back these with a piece of felt for added security]


I really like your memory bears and I am sure they are gratefully received and much loved by those who receive them. What a lovely, kind, and generous thing to do!
ReplyDeleteThey are really really lovely. And a wonderful memory for families. You have amazing patience and skill.
ReplyDeleteIt is such a kind and generous thing to do plus they do look wonderful!
ReplyDeleteSuch a lovely thing to do, Angela.
ReplyDeleteWhat a lovely thing to do - I'm sure they will be appreciated for many years to come!
ReplyDeleteI have been impressed by your kindness every since I read about you taking a day to create clothes for the toys of children in your street.
ReplyDeleteThese are wonderful and will be treasured for sure.